Pattern - Abstract Factory
대부분의 사람들이 괴롭히지 않는 패턴을 기본 개념으로합니다. 그것들을 데이터 구조 나 알고리즘으로 생각하지 마십시오. 대신 코드를 메모를 보내거나 문자를 보내는 등의 메시지를 보내는 사람들로 생각하십시오. 각 개체는 ‘사람’입니다. ‘사람’과 메시지를 서로 보내는 데 사용하는 패턴을 구성하는 방식이 패턴입니다.
의도
구체적인 클래스를 지정하지 않고 관련성을 갖는 객체의 집합을 생성하거나 서로 독립적인 객체들의 집합을 생성할 수 있는 인터페이스를 제공하는 패턴이다.
활용성
-
Application 에서 정의되는 요청에 따라 다른 종류의 Factory를 반환한다.
- 추상 팩토리는 다음의 경우에 사용된다.
- 객체가 생성되거나 구성,표현되는 방식과 무관하게 시스템을 독립적으로 만들고자 할 때 이는 Abstract Factory가 생성을 담당하는데, 실제 생성되는 객체에 대한 구현 및 표현은 Class로 분리되어 관리하기 때문이다.
- 여러 제품군 중 하나를 선택해서 시스템을 설정해야하고 한번 구성한 제품을 다른 것으로 대체 할 수 있을 때 Application이 요청에 따라 필요한 객체를 반환하는데, 해당 객체는 하나의 인터페이스에 의해 추상화된 제품의 구현을 이야기한다.
- 관련된 제품 객체들이 함께 사용되도록 설계되었고, 이 부분에 대한 제약이 외부에도 지켜지도록 하고 싶을 때
- 제품에 대한 클래스 라이브러리를 제공하고, 그들의 구현이 아닌 인터페이스를 노출시키고 싶을 때
-
각 항목에 대한 설명/이해
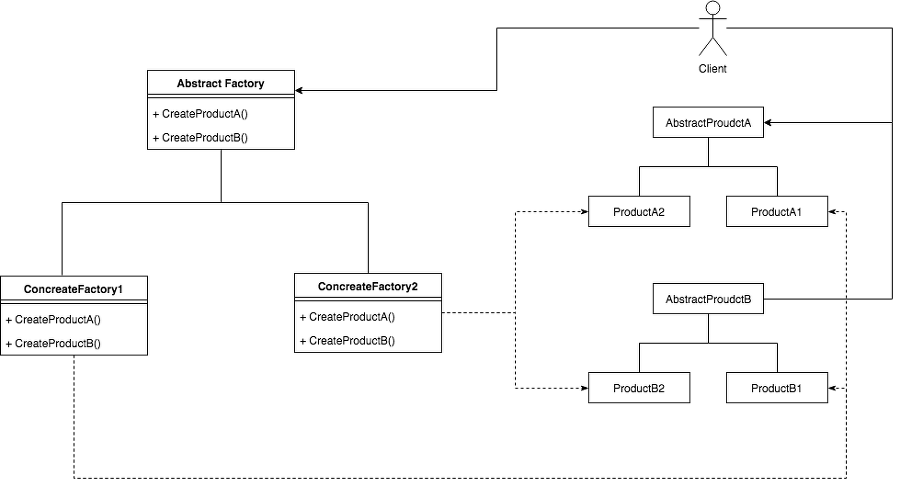
- Abstract Factory : 개념적 제품에 대한 객체를 생성하는 연산으로 인터페이스를 정의합니다
- Concrete Factory : 구체적인 제품에 대한 객체를 생성하는 연산을 구현합니다.
- AbstractProduct : 개념적 제품 객체에 대한 인터페이스를 정의합니다.
- ConcreteProduct : 구체적으로 팩토리가 생성할 객체를 정의하고, AbstractProduct 가 정의하는 인터페이스를 구현합니다.
- Client : AbstractFactory 와 AbstractProduct 클래스에 선언된 인터페이스를 사용한다.
- Abstract Factory 단점
- 새로운 종류의 제품을 제공하기 어려움
- 새로운 종류의 제품을 만들기 위해 기존 추상 팩토리를 확장하기가 쉽지 않음, 생성되는 제품은 추상 팩토리가 생성할 수 있는 제품 집합에만 고정되어 있기 때문이다.
만약 새로운 종류의 제품이 등장하면 팩토리의 구현을 변경해야 한다. 이는 추상 팩토리와 모든 서브클래스의 변경을 가져오게 되고, 인터페이스가 변경되는 새로운 제품을 생성하는 연산이 추가되거나, 기존 연산의 반환 객체 타입이 변경되었으므로, 이를 상속받는 서브클래스 모두 변경되어야 한다.
-
Abstract Factory 관련 패턴
- 팩토리 메서드 패턴을 이용해서 구현
- 원형 패턴을 이용해서 구현할 때도 있음
- 구체 팩토리는 단일체 패턴을 이용해 구현하는 경우가 많음
코드 예제 - 기본 샘플
  package DesignPattern.gof_abstractFactory;

  public class Military {

      public static void main(String[] args) {

          TrainingFactory infantryFactory = TrainingProvider.getFactory("infantry");

          Soldier marine = infantryFactory.create("marine");

          marine.attack();
          marine.getSoldier();

          Soldier firbat = infantryFactory.create("fire");

          firbat.getSoldier();
          firbat.attack();
      }
  }
 package DesignPattern.gof_abstractFactory;

  public interface Soldier {
      String getSoldier();

      String attack();
  }
  package DesignPattern.gof_abstractFactory;

  public class Marine implements Soldier {

      public String getSoldier() {
          return null;
      }

      public String attack() {
          return null;
      }
  }
  package DesignPattern.gof_abstractFactory;

  public class Firebat implements Soldier {

      public String getSoldier() {
          return null;
      }

      public String attack() {
          return null;
      }
  }
  package DesignPattern.gof_abstractFactory;

  public interface TrainingFactory {

      /**
        * @param soldierType
        * @return
        */
      Soldier create(String soldierType);
  }
  package DesignPattern.gof_abstractFactory;

  public class infantryTraingCenter implements TrainingFactory {
      // infantryTraingCenter는 TrainingFactory의 구현을 담당하면서, 추상 팩토리에서 객체를 생성하는 역할을 맞는다..
      public Soldier create(String soldierType) {
          switch (soldierType){
              case "marine":
                  return new Marine();
              case "fire":
                  return new Firebat();
          }
          // Null 을 쓰는 것은 좋지 않으나 패턴 설명을 위해 사용함.
          return null;
      }
  }
  package DesignPattern.gof_abstractFactory;

  public class TrainingProvider {

      /**
        * @param soldierType
        * @return
        */
      public static TrainingFactory getFactory(String soldierType){

          if("infantry".equalsIgnoreCase(soldierType)){
              return new infantryTraingCenter();
          }

          // Null 을 쓰는 것은 좋지 않으나 패턴 설명을 위해 사용함.
          return null;
      }
  }
코드 샘플 - 스타크래프트
- 요구사항 정의
- 스타 크래프트에서는 다양한 유닛이 존재합니다 탱크와 골리앗을 생산할 수 있는 Factory 마린, 메딕, 파이어뱃을 생산할 수 있는 Barrack 레이스, 사이언스 베슬, 베틀 크루저를 생산할 수 있는 Starport
- 요구사항의 공통화
- 모든 건물은 유닛을 생산한다.
- 모든 시스템 건물은 추가적으로 지을수 있어야 한다. 하지만 각 건물의 기능이 추가적으로 변경되지 않는다.
- 모든 유닛은 공격이 주된 목적을 가진다.
  package DesignPattern.gof_abstractFactory.sample003;

  public interface BuilingConstructor {
      public Unit createUnitOrNull(String unitType);
  }
  package DesignPattern.gof_abstractFactory.sample003;

  public class Factory implements BuilingConstructor {
      public Unit createUnitOrNull(String unitType) {
          switch (unitType){
              case "siegetank" :
                  return new SiegeTank();
              default:
                  return null;
          }
      }
  }
  package DesignPattern.gof_abstractFactory.sample003;

  public class Barrack implements BuilingConstructor {
      public Unit createUnitOrNull(String unitType) {
          switch (unitType){
              case "marine" :
                  return new Marine();
              case "firebat" :
                  return new FireBat();
              default:
                  return null;
          }
      }
  }
  package DesignPattern.gof_abstractFactory.sample003;

  public class Starport implements BuilingConstructor {

      public Unit createUnitOrNull(String unitType) {
          switch (unitType){
              case "wraith" :
                  return new Wraith();
              default:
                  return null;
          }
      }
  }
  package DesignPattern.gof_abstractFactory.sample003;

  public interface Unit {

      public void attack();

      public void destroyed();

      public void defend();
  }
  package DesignPattern.gof_abstractFactory.sample003;

  public class FireBat implements Unit {

      public void attack() {

      }

      public void destroyed() {

      }

      public void defend() {

      }
  }
  package DesignPattern.gof_abstractFactory.sample003;

  public class Marine implements Unit {

      public void attack() {

      }

      public void destroyed() {

      }

      public void defend() {

      }
  }
  package DesignPattern.gof_abstractFactory.sample003;

  public class SiegeTank implements Unit {

      public void attack() {

      }

      public void destroyed() {

      }

      public void defend() {

      }
  }
  package DesignPattern.gof_abstractFactory.sample003;

  public class Wraith implements Unit {
      public void attack() {

      }

      public void destroyed() {

      }

      public void defend() {

      }
  }
  package DesignPattern.gof_abstractFactory.sample003;

  public class SCV {

      public static BuilingConstructor createBuildingOrNull(String buildType){
          switch (buildType){
              case "barrack" :
                  return new Barrack();
              case "factory" :
                  return new Factory();
              default:
                  return null;
          }
      }
  }
  package DesignPattern.gof_abstractFactory.sample003;

  public class Battle {
      public static void main(String[] args) {

          BuilingConstructor barrack1 = SCV.createBuildingOrNull("barrack");

          Unit marine1 = barrack1.createUnitOrNull("marine");
          Unit firebat1 = barrack1.createUnitOrNull("firebat");

          marine1.attack();
          firebat1.attack();

          marine1.defend();

          marine1.destroyed();
          firebat1.destroyed();
      }
  }
NodeJS - Factory
JavaScript는 단순성, 유연성, 그리고 작은 공개 API를 위해 함수 위주의 패러다임이 순수한 객체지향 설계보다 더 선호된다는 사실을 강조했었습니다. 이는 객체의 새 인스턴스를 작성할 때 특히 그렇습니다. 실제로, new 연산자 또는 Object.create()를 사용하여 프로토타입에서 직접 새 객체를 만드는 대신 팩토리를 호출하면 여러 면에서 훨씬 편리하고 유연합니다.
무엇보다 먼저 팩토리는 객체 생성을 구현과 분리할 수 있게 해줍니다. 근본적으로 팩토리는 새로운 인스턴스의 생성을 감싸서 우리가 하는 방식에 더 많은 유연성과 제어력을 제공합니다.
function createImage(name){
  return new Image(name);
}

const image = createImage('photo.jpeg');
팩토리는 더 많은 유연성을 제공합니다.
function createImage(name){
  if(name.match(/\.jpeg$/)){
    return new JpegImage(name);
  }

  if(name.match(/\.gif$/)){
    return new JpegImage(name);
  }

  if(name.match(/\.png$/)){
    return new JpegImage(name);
  }

  throw new Exception('Unsupported format');
}
factory는 또한 생성된 객체의 생성자를 노출 시키지 않고 객체를 확장하거나 수정하지 못하도록 합니다.
- https://dzone.com/articles/surface-area-over-volume-ratio
캡슐화를 강제하는 매커니즘
캡슐화는 외부 코드가 내부 세부 정보에 대해서 직접 조작하지 못하게 하여 객체의 접근을 제어하는 기술을 말합니다. 객체와의 상호 작용은 공개된 인터페이스를 통해서만 발생하며 객체의 세부 구현에 대한 변경 사항과 외부 코드를 분리합니다. 이것을 정보 은닉이라고도 합니다. 캡슐화는 상속, 다형성 및 추상화와 함께 객체 지향 디자인의 기본 원칙이기도 합니다.
- 캡슐화를 적용하는 유일한 방법은 함수 범위와 클로저를 사용하는 것입니다.
function createPerson(name) {
  const privateProperties = {};

  const person = {
    setName : name => {
      if(!name) throw new Error('A person must have a name');
      privateProperties.name = name;
    },
    getName : () => {
      return privateProperties.name;
    }
  };


person.setName(name);
return person;

}
팩토리는 private 멤버를 생성하기 위한 기술 중 하나일 뿐입니다. 실제로 이것이 가능한 다른 접근 방법들은 다음과 같습니다.
생성자에서 private 변수 정의하기
규칙 사용하기, 예를 들어 속성의 이름 앞에 밑줄 “_” 또는 달러 기호 “$”를 붙입니다.
ES2015 WeakMap 사용하기 ( https://fitzgeraldnick.com/2014/01/13/hiding-implementation-details-with-e6-weakmaps.html )
팩토리를 사용한 예제
class Profiler {
  constructor(label){
    this.label = label;
    this.lastTime = null;
  }

  start() {
    this.lastTime = process.hrtime();
  }

  end() {
    const diff = process.hrtime(this.lastTime);
    console.log(`Timer "${this.label}" took ${diff[0]} seconds and ${diff[1]} nanoseconds.`);
  }
}
- JavaScript의 동적형 결정(dynamic typing)덕분에 한편으로는 new 연산자로 인스턴스화된 객체를, 다른 편으로는 간단한 객체 리터럴을 반환할 수 있다는 것
module.exports = function(label){
  if(process.env.NODE_ENV === 'developmen'){
    return new Profiler(label); // [1]
  } else if(process.env.NODE_ENV === 'production'){
    return { // [2]
      start : function() {},
      end : function() {}
    }
  } else {
    throw new Error("Must Set NODE ENV");
  }
}
우리의 팩토리는 완벽하게 동작합니다. 팩토리 함수를 사용하여 어떤 방식으로든 객체를 생성할 수 있으며, 추가적인 초기화 단계를 수행하거나 특정 조건을 기반으로 다른 유형의 객체를 반환할 수 있습니다. 그리고 이 모든 세부사항을 객체의 소비자로부터 격리할 수 있습니다.
const profiler = require('./profiler')

function getRandomArray(len) {
  const p = profiler('Generating a ' + len + ' items long array');
  p.start();
  const arr = [];
  for(let i = 0; i < len; i ++){
    arr.push(Math.random());
  }
  p.end();
}

getRandomArray(1e6);
console.log("Done");
합성 가능한 팩토리 함수
향상된 팩토리 함수를 만들기 위해 함께 “조합”될 수 있는 특정 유형의 팩토리 함수를 말합니다.
const stampit = require('stampit')

const character = stampit().
                    props({
                      name : 'anonymous',
                      lifePoints : 100,
                      x : 0,
                      y : 0
                    })
const c = character();
c.name = 'John';
c.lifePoints = 10;
console.log(c); // { name : 'John' , lifePoints : 10, x : 0, y : 0 }
const mover = stampit()
    .methods({
      move(xIncr, yIncr) {
        this.x += xIncr;
        this.y += yIncr;
        console.log(`${this.name} moved to [${this.x}, ${this.y}]`);
      }
    });

const slasher = stampit()
    .methods({
      slash(direction) {
        console.log(`${this.name} slashed to the ${direction}`);
      }
    });

const shooter = stampit()
    .props({
      bullets : 6
    })
    .methods({
      shoot(direction){
        if(this.bullets > 0 ){
            -- this.bullets;
            console.log(`${this.name} shoot to the ${direction}`);
        }
      }
    })
위의 코드를 바탕으로 객체를 합성하면,
const runner = stampit.compose(character, mover);
const samurai = stampit.compose(character, mover, slasher);
const sniper = stampit.compose(character, shooter);
const gunslinger = stampit.compose(character, mover, shooter);
const westernSamurai = stampit.compose(gunslinger, samurai);

const gojiro = westernSamurai();
gojiro.name = 'Gojiro Kiryu';
gojiro.move(1,0);
gojiro.slash('left');
gojiro.shoot('right');
실전에서의 활용 예제
- Dnode(https://npmjs.org/package/dnode)
- Restify(https://npmjs.org/package/restify)
- http-proxy
- 코어 Node.js HTTP 서버
- bunyan (https://npmjs.org/package/bunyan)
- react-stampit(https://www.npmjs.com/package/react-stampit)
- remitter(https://www.npmjs.com/package/remitter) , pub/sub 기반
Kotlin - Abstract Factory
package bong.lines.patterns.abstractfactory.code

enum class UnitType {
    MARINE,
    MEDIC
}
package bong.lines.patterns.abstractfactory.unit.inf

interface Unit {
    fun checkStatus();
}

package bong.lines.patterns.abstractfactory.unit

import bong.lines.patterns.abstractfactory.unit.inf.Unit

class Marine : Unit {
    override fun checkStatus() {
        print("Marine Status is Good!")
    }
}

package bong.lines.patterns.abstractfactory.unit

import bong.lines.patterns.abstractfactory.unit.inf.Unit

class Medic : Unit {
    override fun checkStatus() {
        print("Medic Status is good")
    }
}

package bong.lines.patterns.abstractfactory.building

import bong.lines.patterns.abstractfactory.code.UnitType
import bong.lines.patterns.abstractfactory.unit.Marine
import bong.lines.patterns.abstractfactory.unit.Medic
import bong.lines.patterns.abstractfactory.unit.inf.Unit

class Barrack {
    fun create(unitType: UnitType) : Unit {
        return when(unitType){
            UnitType.MARINE -> Marine()
            UnitType.MEDIC -> Medic()
        }
    }
}
package bong.lines.patterns.abstractfactory

import bong.lines.patterns.abstractfactory.building.Barrack
import bong.lines.patterns.abstractfactory.code.UnitType
import bong.lines.patterns.abstractfactory.unit.inf.Unit

fun main() {
    var marine: Unit = Barrack().create(UnitType.MARINE)

    marine.checkStatus()

    println()

    var medic: Unit = Barrack().create(UnitType.MEDIC)

    medic.checkStatus()
}